Friday, October 24, 2008

Buttermilk Biscuits


On a cool fall day, what's better than a hearty bowl of soup paired with warm, fluffy, fresh-from-the-oven buttermilk biscuits? These are quick and easy to whip up for a weeknight dinner, and they're much tastier than the instant-mix versions (Bisquick, I'm looking at you).

In the interest of full disclosure, I based my biscuits on Alton Brown's recipe, not Martha's. Mr. Judge insisted that Alton has the Best. Biscuit. Recipe. Ever., and he insisted that I try his recipe first. Sorry, Martha! I'll try your recipe next time.

Technically, I used the recipe from Alton's baking book, not the recipe on the Food Network site. The recipes are similar, but slightly different.

As usual, the first step was to mix together the dry ingredients (flour, baking soda, baking powder, and salt). Alton's recipe included the unique step of using a box grater to grate the butter into the dry ingredients. He thinks this is easier than the usual method of using a pastry blender to cut the butter into the flour.


Next, he recommends rubbing the butter into the flour with your fingers, until half of it is integrated with the flour, and the rest of the butter is pea-sized (or smaller).


The recipe in his baking book uses only butter, not shortening.
Next, it was time to combine the liquid ingredients. Alton's recipe calls for buttermilk and yogurt, which is kind of unusual (most biscuit recipes don't include yogurt). Apparently the yogurt adds extra moistness and a nice tang. His recipe specifically states that you cannot use fat-free yogurt, which is what I usually buy. I knew my husband had recently picked up some yogurt at the store, so I asked him what kind it was. He assured me it was whole-milk yogurt, because he would never buy skim yogurt. So, I looked in the fridge, and guess what I found?


D'oh! But instead of giving up, I decided to forge ahead with the fat-free yogurt and hope for the best. I decided if the biscuits didn't work out, I would blame the yogurt first, and my husband second.

I mixed together the liquid ingredients (buttermilk, yogurt, and one egg).


Then I added the flour mixture to the buttermilk mixture. This formed a very gloopy, lumpy batter.


I turned the batter out onto some parchment paper before kneading, because I knew this would be an extremely sticky process.


Instead of "kneading" the dough, I used Alton's suggestion of folding it three times, kind of like a tri-fold wallet. This is what it looked like after the third fold.

I flattened the dough to about a one-inch thickness, and I used a 2-inch round biscuit cutter to cut out the individual biscuits. They were very sticky, and my hands were covered with dough, so I couldn't take a good photo of them during this stage.


I placed the biscuits on a baking sheet and put them in the oven.

Twenty minutes later, I had warm, fluffy biscuits. They were moist and buttery on the inside, and crusty brown on the outside. Mmmmm yum.

This is how I like to eat them - with a nice pat of butter on top. They're also very tasty with pumpkin butter (which is how I ate them for breakfast the next day).


Alton Brown's recipe was a success, and I'm going to try Martha's recipe next time. Either way, I highly recommend making your own biscuits from scratch. The small effort involved is well worth the result.

Friday, October 17, 2008

Miniature Gingerbread Cakes

I was invited to attend a Fall Baking potluck brunch last weekend, and I wanted to take something seasonal and festive. I had a feeling there would be a lot of apple and pumpkin treats, so I decided to be a rebel and make these gingerbread cakes. Aren't they cute? Ginger is one of my favorite foods, so this was perfect for me. This also gave me an opportunity to use my decorative mini-muffin tins for the first time. This means they were a good investment, right?

As usual, I used the recipe from my copy of Martha's Baking Handbook, but I think this is the identical recipe on Martha's web site.

I made some slight modifications to her original recipe. Her recipe calls for mixing together one cup of boiling water and 2 teaspoons baking soda, setting them aside, and then adding them into the batter as one of the final steps. I've never heard of doing this before. I spent some time searching the internet, trying to figure out what kind of magical chemical reaction occurs when you mix together boiling water and baking soda. I couldn't find anything useful related to cake baking (although I did find a lot of recipes for polishing silver). So, in my infinite wisdom, I decided to skip this step entirely. I added the baking soda to the rest of the dry ingredients, and instead of adding one cup of water to the batter, I substituted one cup of milk. I thought this would give the cakes a richer flavor. Did it work? Stay tuned....

First, I sifted together the dry ingredients (flour, baking soda, baking powder, salt, spices) into a large bowl.


Then I creamed the butter and brown sugar together in my stand mixer.
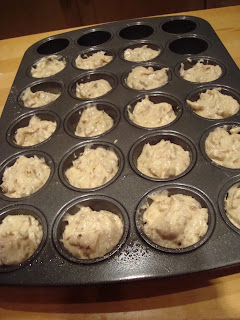
See, nice and fluffy. I added molasses, freshly grated ginger (key ingredient!), eggs, and milk to the butter/sugar mixture. Then I added the flour mixture to the rest of the cake batter. When everything was mixed together, I poured the batter into my cute little cake tin. Correction: my heavily greased cute little cake tin. I was really worried about the batter sticking to my molds, so I used a lot of non-stick spray on these babies.

After 15 minutes in the oven, they were perfectly baked.

I carefully flipped over my cake tin, and they came out of the molds perfectly!

The recipe in Martha's book involves covering the tops of the cake with chocolate ganache. That sounds amazingly good, but I thought it would be a bit heavy for a brunch, so I decided to dust the tops of the cakes with powdered sugar instead. The sugar also emphasized the different shapes of each cake.

Perfect for the holidays! And so tasty, too. I really loved these. They have a very strong ginger flavor, which I love. They also freeze very well, if you wrap them up individually in plastic wrap.

Thursday, October 9, 2008

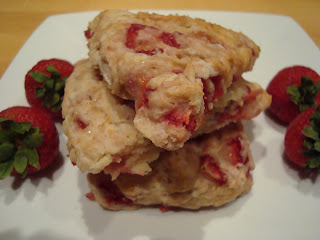
Fresh Strawberry Scones

I found some great strawberries on sale at my local market, which is a rare treat for October. I usually try to eat produce in season, but these were so irresistible! I bought two pounds of berries, and I decided to use half of them for baking. I wanted to try something a little different, so I flipped through Martha's Baking book until inspiration struck me. Scones! I love scones, but I've never made them before, and I've never tried strawberry scones.

Martha's Book includes three different recipes for scones, but none of them use fresh fruit. I had a feeling there would be some major differences in the moisture content with dried vs. fresh fruit, and I wasn't sure if wanted to "wing it" by myself. Luckily, one of my favorite food bloggers, Katie at Good Things Catered, published a great recipe for fresh strawberry scones. I decided to adapt her recipe for my own scones. Thanks, Katie! And this means I can actually print my recipe, instead of worrying about copyright infringement (I hear Martha Stewart has great lawyers).


Fresh Strawberry Scones

Ingredients:
2 1/4 cup all purpose flour (plus a little extra for handling the dough)
1/4 c. granulated sugar
1 Tbsp raw or sanding sugar
1 Tbsp baking powder
1/4 tsp salt
1 stick (8 Tbsp) butter, chilled and cut into small pieces
1 egg
1/4 cup yogurt (I used plain Greek-style yogurt)
1/4 cup milk
1 tsp orange zest
1 pound fresh strawberries, diced (about 2 cups)

Directions:

-Preheat oven to 350 degrees and line baking sheet with parchment.

-In a small bowl, combine egg, yogurt, milk, and zest. Whisk to combine thoroughly and set aside.


-In a large bowl, combine flour, sugar, powder, salt, and whisk to combine.


-Using a pastry cutter or two knives, cut butter into flour until all pieces are smaller than pea-sized.


-Add diced strawberries, and toss to coat.


-Add wet ingredients to dry and mix in lightly with a fork until dough just comes together.

-Turn dough out onto well floured work surface and pat into large ball. If the dough is too sticky, you can add up to 1/4 cup of extra flour, 1 Tbsp at a time. I had to add about 1/8 cup extra.


-Cut the large ball of dough in half.

-Shape half of the dough into a flat disk shape and cut it into 6 slices using a sharp knife.


-Place individual scones on the baking sheet, one inch apart. Repeat with the other half of the dough.

-Sprinkle the tops of the scones with raw (sanding) sugar and place in the oven.

-Bake until scones turn slightly brown, about 25 minutes.

-Remove from the oven and let them cool on the baking sheet for 10 minutes.

-Transfer to a wire rack and let them cool for another 10-15 minutes.


Time to eat!


These scones were delicious! I will definitely be making homemade scones again. Yum yum yum! You could adapt this recipe to use any fresh berry.

Wednesday, October 8, 2008

Maple Pecan Cupcakes with Maple Buttercream Frosting

One of the first recipes I flagged in Martha's Baking Handbook was her recipe for Maple Walnut Cupcakes. I love maple, I love cupcakes, and while I don't love walnuts, I do love pecans. And who doesn't love buttercream frosting? Now that fall is in the air, I decided it was time to create some maple-themed goodness.

Although I used the recipe from Martha's book, there is a very similar recipe on her web site. That recipe is for a layer cake, but you can easily turn it into cupcakes by pouring the batter into lined cupcake tins and baking them for 25 minutes. I actually think the web site recipe may be better, because it uses maple syrup in the cake batter (the recipe in her book does not; it relies on the maple buttercream for all of the maple flavor).

These cupcakes were fairly easy to make, although there was one kitchen casualty. You have to keep reading for the details.

The first step of the recipe required sifting together the dry ingredients in a large bowl (flour, baking powder, salt, ground spices).


Then I used my stand mixer to cream the butter and sugar together.
I added the eggs and beat everything together until they were thoroughly combined. The mixture got nice and fluffy.Next, I added the rest of the liquid ingredients (maple syrup, vanilla extract) and stirred until everything was combined. (Sorry, no photo of this step.)

The recipe called for medium-to-finely chopped nuts. I toasted my pecans before chopping them, because I wanted to give them some extra flavor. In hindsight, I think I should have chopped them more finely than this, but I think this is a matter of personal taste.
I added the dry ingredients to the liquid ingredients and mixed them together with a rubber spatula.
Finally, I mixed in the pecans with a wooden spoon.


Now that my batter was ready, I poured it into lined muffin tins. I made half of them into regular-sized cupcakes, and the other half into mini-sized cupcakes.


This is what they looked like when I took them out of the oven. They were lightly browned on top, and they passed the "toothpick test."

Now I had to create the buttercream frosting. I love buttercream, but shockingly, I've never made it before.
The first step of the frosting recipe was to beat 6 egg yolks on high speed, until they became fluffy. This is a picture of the egg yolks while my mixer was whirring.
In the meantime, I had to boil the maple syrup on the stove and cook it until a candy thermometer reached 240 degrees, which was supposed to take about 15 minutes. I have never made homemade candy before, and I wasn't even sure if I had a candy thermometer, but I found one in the back of my utensil drawer.
If you've never done this before, I can tell you that maple syrup gets kind of volatile after it's been boiling for 15 minutes. It looks fine here:
But after about 10 minutes, it threatened to overflow the rim of my saucepan. Stirring it only made things worse! I had to remove the pan from the burner several times, to prevent boiling maple syrup from erupting all over my stove.
Can you see the candy thermometer clipped to the left side of my saucepan? When the maple syrup reached the proper temperature, I tried to remove the thermometer, but the sticky syrup didn't want to let the thermometer go. Part of the glass of the thermometer broke off, and the thermometer came apart into several pieces. RIP candy thermometer. My first Martha-related kitchen casualty. :(
After removing the syrup from the heat, I slowly poured it into my egg mixture, and I beat them together for about 2 minutes. Then I added the chilled butter, and I thoroughly beat everything together for several minutes, until the frosting was nice and fluffy. Hello, maple buttercream! Come to mama!
Nom nom nom! We ate the cupcakes with homemade maple ice cream (which is my new favorite ice cream, by the way).

I want to give an honest evaluation of all of the recipes I make, so I will admit that these were not the best cupcakes I've ever had. I LOVED the maple buttercream, and I will definitely make that again. But the actual cupcakes were only okay. They seemed more like muffins than cupcakes to me. I think the nuts threw me off, because the texture of the cupcakes reminded me of the banana-nut muffins I made earlier in the week. Also, the recipe in Martha's book didn't add any maple syrup to the actual cupcakes. They weren't nearly maple-y enough. If I wanted to make these again, I'd try the recipe on her web site, which uses maple syrup in the cake. I'd also chop the nuts more finely, and possibly reduce the amount of nuts in the recipe.

Tuesday, October 7, 2008

I Live to Eat

There are a few different lists floating around the internet about the Top 100 Foods you must eat in your lifetime. The most well-known is the Omnivore's 100 (there's a different list for vegetarians). There's also a list based on American foods, and even a list for sweets. I like to think I'm fairly open-minded when it comes to food, so I'm going to post them here and see how I do.

Here are the instructions:

1) Copy this list into your blog or journal, including these instructions.
2) Bold all the items you’ve eaten.
3) Italicize any items that you would never consider eating.
4) Optional extra: Post a comment here at www.verygoodtaste.co.uk linking to your results.

Here's my list, with comments in parentheses.

The VGT Omnivore’s Hundred:

1. Venison
2. Nettle tea
3. Huevos rancheros
4. Steak tartare
5. Crocodile
6. Black pudding (I'm open minded, but this just sounds disgusting.)
7. Cheese fondue
8. Carp
9. Borscht
10. Baba ghanoush
11. Calamari
12. Pho
13. PB&J sandwich
14. Aloo gobi

15. Hot dog from a street cart
16. Epoisses
17. Black truffle
18. Fruit wine made from something other than grapes
19. Steamed pork buns
20. Pistachio ice cream
21. Heirloom tomatoes
22. Fresh wild berries
23. Foie gras
24. Rice and beans
25. Brawn, or head cheese
26. Raw Scotch Bonnet pepper - I haven't just bitten into one, but I've eaten them with other things
27. Dulce de leche
28. Oysters
29. Baklava
30. Bagna cauda - I've never heard of this before, but after looking it up, I want to try it!
31. Wasabi peas
32. Clam chowder in a sourdough bowl
33. Salted lassi
34. Sauerkraut
35. Root beer float
36. Cognac with a fat cigar (I've had both, but not together)
37. Clotted cream tea
38. Vodka jelly/Jell-O (this is on the list? really?)
39. Gumbo
40. Oxtail
41. Curried goat (I accidentally ate this in India. It wasn't bad.)
42. Whole insects (I have a severe insect phobia. There is no way I'd voluntarily eat them.)
43. Phaal (I'm not sure if I've eaten this, so I'm not bolding it.)
44. Goat’s milk (I've had cheese made from goat's milk... does that count?)
45. Malt whisky from a bottle worth £60/$120 or more
46. Fugu
47. Chicken tikka masala
48. Eel
49. Krispy Kreme original glazed doughnut (mmm heaven)
50. Sea urchin (didn't like it much, but I ate it)
51. Prickly pear
52. Umeboshi
53. Abalone
54. Paneer
55. McDonald’s Big Mac Meal
56. Spaetzle
57. Dirty gin martini (didn't like it, but I've tried it)
58. Beer above 8% ABV
59. Poutine
60. Carob chips
61. S’mores
62. Sweetbreads
63. Kaolin (I googled this, and it seems to be the drug found in Kaopectate. Huh?)
64. Currywurst
65. Durian
66. Frogs’ legs
67. Beignets, churros, elephant ears, or funnel cake
68. Haggis (no innards, please)
69. Fried plantain
70. Chitterlings or andouillette
71. Gazpacho
72. Caviar and blini
73. Louche absinthe (I've had plenty of absinthe... not sure about the type though)
74. Gjetost, or brunost
75. Roadkill
76. Baijiu
77. Hostess Fruit Pie
78. Snail
79. Lapsang souchong
80. Bellini
81. Tom yum
82. Eggs Benedict
83. Pocky (I saw some in an Asian market and decided to try it. Didn't like it.)

84. Tasting menu at a Michelin-star restaurant.
85. Kobe beef (shockingly, I don't think I've had this)
86. Hare
87. Goulash
88. Flowers

89. Horse (that's just wrong)
90. Criollo chocolate
91. Spam
92. Soft shell crab
93. Rose harissa
94. Catfish
95. Mole poblano
96. Bagel and lox
97. Lobster Thermidor (I've had lots of lobster, but not thermidor.)
98. Polenta
99. Jamaican Blue Mountain coffee

100. Snake

Eaten - 79
Don't want to eat - 8
Need to try - 14

100 American Foods

This is a similar list, but it's specific to American foods. If a geographic location is named, I'm going to count it if I've eaten food in that style (even if I didn't necessarily eat it in that exact city or state).

1. New York pizza (I've eaten the real thing in NY, and Oh My God it can't compare to pizza anywhere else.)
2. Hoppin’ John (We make this for New Year's every year.)

3. New Mexico green chile
4. Homemade buttermilk biscuits
5. Tasso (I love this with some shrimp and grits.)
6. Whole Maine lobster (Eaten at a lobster pound in Maine.)
7. Calabash-style shrimp and hushpuppies
8. Kansas City barbecue ribs (I've never been to KC, but I've had bbq in this style.)
9. Hot glazed Krispy Kreme (First eaten when I was in high school in Florida.)
10. San Diego fish tacos (Love them with some fresh lime juice squeezed on top.)
11. Cheese curds
12. Key lime pie (Hello, I'm from Florida. I have Key lime pie running through my veins.)
13. Philly cheese steak (I prefer Geno's over Pat's.)
14. Memphis pork barbecue sandwich
15. Lowcountry boil
16. Huckleberry pie (I've eaten huckleberries, but I don't think I've ever had them in a pie.)
17. New England clam chowder
18. Boiled peanuts (Tried them once, and that was enough.)
19. Buffalo burger
20. Eggs Benedict
21. Pastrami on rye (one of my favorite sandwiches)
22. Corned beef and cabbage
23. Pancakes with maple syrup
24. Everything bagel with cream cheese and tomato
25. Thin Mints (preferably frozen) (I prefer Tagalongs)
26. Frito pie
27. Potato knish with mustard
28. Silver Queen corn on the cob
29. Soft pretzel from a street cart
30. Fresh-picked blueberries (I love wild Maine blueberries in the summer.)
31. Sourwood honey - never had it, but now I want to try it
32. State fair funnel cake
33. Chesapeake crab cakes (I live in Maryland. Enough said.)
34. Candied yams
35. Oyster dressing (except I call it "stuffing")
36. Snow cone or snowball
37. Wild Alaskan salmon
38. Sautéed morels
39. Persimmon pudding - I've never heard of this, but I'm going to look it up, because I actually have some persimmon at home right now.
40. General Tso’s Chicken
41. Frozen custard
42. Italian sausage with peppers and onions on a hoagie bun
43. Chili dog
44. Buffalo wings with blue cheese
45. Spam musubi - I saw this in Hawaii and I was horrified.
46. Saltwater taffy
47. Fluffernutter sandwich on Wonder Bread
48. Black and white cookie
49. Frybread (I still have dreams about the frybread I ate on a Native American reservation in Arizona.)
50. BLT with thick-cut applewood bacon
51. Baked beans
52. Pumpkin pie
53. Collards with vinegar and Tabasco
54. Tex-Mex fajitas with skirt steak and sautéed peppers
55. Fried green tomatoes
56. Succotash
57. Shrimp and grits (One of my favorite foods of all time.)
58. Hot water cornbread
59. Barbecue chicken pizza with red onions
60. Chicken fried steak
61. Carnitas burrito
62. Apple butter
63. Geoduck (Apparently this is a type of clam?)
64. Soft-serve ice cream cone dipped in chocolate shell
65. Pecan pie
66. Catfish supper at a church or fire station (I haven't eaten it in those locations.)
67. Oysters Rockefeller
68. Homemade cranberry sauce
69. Pimiento cheese
70. MoonPie washed down with R.C. Cola (Moonpie, yes. RC Cola, no.)
71. Pickled watermelon rind
72. Cracker Jacks at the ball game
73. Smithfield ham
74. Meatloaf and mashed potato blue plate special at diner
75. Chicken and waffles
76. Po’Boy
77. Green bean casserole with French’s fried onions
78. Stuffed sopaipillas
79. Turducken (I've never had it, but my dog eats a food called "turnducken.")
80. Shad roe on toast (and I never want to eat it again)
81. Sweet potato casserole with or without marshmallows
82. Cioppino
83. New York cheesecake
84. Pan-fried river trout
85. Jambalaya
86. North Carolina pig pickin’
87. California rolls
88. Burgoo
89. Penuche fudge
90. Fried peanut butter and banana sandwich (the Elvis)
91. Scrapple or livermush (kind of disgusting)
92. Elk medallions in red wine reduction (I actually ate Elk somewhere out West)
93. Muscadine grapes
94. Cheeseburger at backyard barbecue
95. Open-face turkey sandwich
96. Chicago deep dish pizza
97. Cobb salad
98. Peach pie a la mode
99. Macaroni and cheese with Tillamook sharp cheddar (I use Tillamook cheddar when I make mac and cheese at home. It's truly the best!)
100. Root beer float

Eaten - 91
Don't want to eat - 0
Need to try - 9

I still have a lot of eating to do! How many have you eaten?

Saturday, October 4, 2008

Popovers, Part One

Why "part one?" Let's just say this baking experiment didn't turn out quite the way I wanted it to. To see what went wrong, keep reading.

My husband looooves popovers. When he noticed there was a recipe for popovers in my Martha Stewart Baking book, he practically begged me to make them. Martha's recipe strongly suggests that you use a special popover tin, which is different from a regular muffin tin. However, I didn't have a popover tin. I knew if anyone could figure out how to make popovers without a popover tin, it would be Alton Brown. Alton hates kitchen "unitaskers" (kitchen gadgets which only serve a very specific purpose, i.e. egg slicers, avocado slicers, grapefruit spoon, pickle fork). Coincidentally, Food Network aired Alton's show on popovers last week. Guess what he used to make his popovers? A popover tin. Sigh.

After a brief trip to Williams-Sonoma, I had my very own unitasker... errr, I mean popover tin.

By the way, you can find Martha's recipe for popovers here.

The ingredients are incredibly simple: butter, flour, milk, eggs, and salt. You whisk them all together and pour the batter into the tins (the batter should only fill the lower 1/3 of the cups).


The steep sides of the popover tins are supposed to help the dough rise in the oven. I put the popovers in the oven and waited for them to rise. After about 20 minutes, the dough had risen to 3 inches above the surface of the tin, which is exactly what Martha said it should do.

This is where something went wrong. The recipe said I should bake the popovers for approximately 30 minutes. But they looked right after 20 minutes in the oven, so I went ahead and took them out. They *immediately* deflated when I took them out of the oven.


Waaaaaaah! My husband said they tasted good, but the texture was completely off. I think I should have kept them in the oven longer, so their shapes could stabilize. I'm going to try this recipe again soon, and hopefully it will work next time.