Sunday, September 28, 2008
Peach-Raspberry Pie
If you're playing at home, here's a recipe for Peach-Raspberry Pie from Martha's web site.
I've never made peach pie before, but I thought it was interesting that this recipe called for unpeeled peaches. I'm used to peeling fruit before baking with it. But who am I to question Martha? If she wants sliced, unpeeled peaches, then that's what I'll use.
I defrosted my frozen raspberries and drained off most of their liquid, because I didn't want a soggy pie. I added the raspberries, as well as all of the other ingredients of the pie filling, to the peaches.
The filling still seemed very liquidy, but I wasn't sure if I should remove more of the liquid before adding the filling to the pie crust. I ended up draining about half of the liquid, but in retrospect, I probably should have removed even more. Martha's instructions were to keep the fruit juices in the filling, but I think the fact that I used frozen raspberries changed things.
Next, I added the filling to the bottom of the pie crust, and I dotted the top of the pie with small pieces of chilled butter.
See how much liquid was in there? Alarm bells were going off in my mind, but since I'd already filled the crust, I didn't think there was much I could do at that point.
Finally, I topped the pie with my lattice crust and sprinkled (raw) turbinado sugar over the top for some extra crunch and texture.
After an hour in the oven, I had a freshly baked pie!
As you can see, the crust could not fully contain the fruit juices, so they started to spill over the top. This wasn't a huge problem, except that it made the pie a little messy, and the bottom crust had less structure than I would have liked.
But the flavor... oh, the flavor of the pie was incredible! The peaches were ripe and full of flavor. The raspberries added just a hint of tartness. The crust was delicate, flaky, and oh-so-buttery. I had to control myself from eating half of the pie in one sitting. This one is definitely a keeper.
Pate Brisee (pie dough)
I decided it's time for me to make my first homemade double-pie-crust. And not just any pie crust, but one with a lattice top! Woohoo, I'm pulling out the big guns, now!
As usual, I used the recipe from Martha's Baking Handbook, but here is her recipe for pate brisee on her web site (there are some slight differences between the two versions).
It all started with some simple ingredients - flour, butter, and water in the food processor.
After I mixed in the water, the dough started to look like... well, dough. I separated the dough into two equal(ish) halves, and then wrapped it in plastic and put it in the fridge to chill.
After the dough was chilled, it was time to roll it out to a large circle that would fit over the bottom and sides of my 9-inch pie plate. This is where things started to get tricky.
So, I have this nice, flat, very thin piece of dough. Now how the heck do I get it onto my pie plate in one piece, without smooshing or tearing it?
I'll wrap it back around my rolling pin, and then attempt to unroll it again over my pie plate. Voila! (It took me two attempts to do this, by the way.)
Look how well it fits! I trimmed the overhang to about one-half inch, maybe a smidge longer.
Now I had to figure out what to do with the top of the pie crust. I wanted to make a lattice-top, which looks kind of like a basket weave. I took my second ball of dough out of the fridge, rolled it out, and cut it into 1-inch strips. Then I practiced weaving them together on parchment paper, before I transferred everything to the actual pie. It wasn't difficult, once I got the hang of it.
Martha's Baking book recommends that novice bakers weave the lattice top on parchment paper, then refrigerate the dough until it gets hard, so you can transfer the entire lattice top onto the pie in one fell swoop. I tried to do that. It didn't work. The lattice was too large and unstable to move by itself, and it was too difficult to use the rolling pin trick. So I had to undo the entire thing and re-weave it over the top of the pie. It was kind of a pain, but I knew what to do the second time around, so it only took me a few minutes.
This is what the pie looked like (before baking) with both crusts in place. The brown stuff on top is raw turbinado sugar. The rest of the pie recipe will be in my next post!
Thursday, September 25, 2008
Braided Challah Bread
I encountered my first stumbling block early, when I realized Martha's recipe calls for fresh yeast. There was a picture of it in her book, and it looked kind of like a block of cheese (soft, smooth texture). My husband has baked bread before, so I asked him where I could find fresh yeast. His answer: "no where around here." Lovely. I'm not ready to order ingredients from mail-order catalogs, so I decided to substitute "active dry yeast," which we had in the house. I found some conversions on-line, and I crossed my fingers that it would work.
My first bread-baking project ended up being a two-day process. I started making the dough one evening after I came home from work, not realizing that I'd have to stay up until 2 am if I wanted to see it through to the end. I had to let the dough rise (for 2 hours), then punch it down and let it rise again (for at least 90 minutes). Then I had to braid it and let it rise a THIRD time before baking. The Husband suggested that I could leave the dough in the fridge overnight, and it would rise more slowly. I was nervous that this wouldn't work correctly, but I was too tired to stay up all night, so I decided to try it.
The next day, I braided the dough, let it rise again, and finally baked it. I was VERY impressed with the final result, especially considering the modifications I made. The bread looked perfect. The texture was a little denser than what I'm used to, but the flavor was spot-on. I think the difference in texture may be due to the way I let the dough rise, so I want to try making it again. But all in all, I was extremely pleased with the result.
I should have taken some pictures of what the dough looked like before it baked, but I wasn't thinking. I'm definitely going to make this recipe again, so I'll try to take photos next time.
A slice of challah with some blackberry jam makes a perfect breakfast!
The closest recipe I could find on Martha's web site was for this pumpkin challah bread. It's not traditional, but it sounds great for fall.
Monday, September 22, 2008
Oatmeal Chocolate Chip Cookies
The recipe in her book is very similar to this one for oatmeal-raisin cookies from her web site.
The first step of the recipe was to mix together the dry ingredients (except for the oats). There were a couple of unique ingredients in this recipe, including shredded coconut.
Then I creamed the butter and sugar in my stand mixer. Here is a "before" picture...
And an "after" picture....
I added eggs and vanilla, and then added the flour mixture to the sugar/butter mixture. Finally, I stirred in the oats and chocolate chips.
This is a great cookie dough batter to eat raw. I ate a little too much of it that way!
I baked the cookies in my convection oven, and I was able to cut down on the recommended baking time by about 1/3. I think the final results speak for themselves:
This is a great, hearty cookie with a lot of oat flavor. I think it emphasizes the oats as much as the chocolate. If you're looking for a traditional chocolate chip cookie, this may not be the best recipe for that. But if you want really good oatmeal flavor, with a decent chocolate kick, and a hint of spice, I would recommend it.
Tuesday, September 16, 2008
Maple Pecan Apple Crisp
Ingredients
1/3 cup all-purpose flour
1/2 cup packed light brown sugar
1/3 cup regular oats
1/4 teaspoon ground cinnamon
1/4 cup chilled butter or stick margarine, cut into small pieces
3 tablespoons chopped pecans
7 cups sliced peeled apples (about 3 pounds) - I used Jonagold, but any baking apple will work.
1/4 cup maple syrup
1/2 teaspoon ground cinnamon
Preparation
Preheat oven to 375°.
Lightly spoon flour into a dry measuring cup; level with a knife. Combine flour, sugar, oats, and 1/4 teaspoon cinnamon in a medium bowl; cut in butter with a pastry blender or 2 knives until mixture is crumbly. Stir in pecans.
Combine apple and remaining ingredients in a large bowl; toss well. Spoon apple mixture into an 8-inch square baking dish or 1 1/2-quart casserole. Sprinkle with crumb mixture. Bake at 375° for 30-35 minutes or until golden brown. Serve warm.
Nutritional Information (for 9 servings, calculated by Cooking Light)
Fat: 7.1g (sat 3.4g,mono 1.9g,poly 1.3g)
Protein: 1.8g
Carbohydrate: 36.5g
Fiber: 2.3g
Cholesterol: 14mg
Iron: 0.9mg
Sodium: 58mg
Calcium: 27mg
Sunday, September 14, 2008
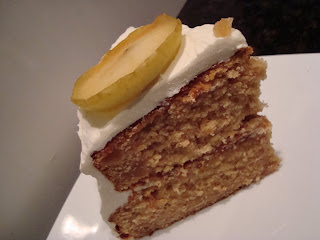
Apple-Spice Layer Cake with Creamy Goat Cheese Frosting
The first step of the recipe is to make, essentially, homemade chunky applesauce. First, I caramelized some sugar in a medium saucepan, and then added chunks of apples and a little bit of lemon juice. I cooked the apples down until they were soft and mushy.
Side note: I'm a very impatient person, and I usually have an incredibly hard time waiting for cakes to cool completely before frosting them. I've tried to frost my share of warm cakes, and I know it causes them to fall apart into a crumbly mess, so I SHOULD KNOW BETTER. But I still don't want to wait 2 hours to frost my cakes. I took a tip from Martha's book, and after I cooled my cake layers on wire racks for 20 minutes, I wrapped them in plastic wrap and stuck them in the fridge for another 40 minutes. Voila - perfectly cooled cakes in half the time!
Per Martha's suggestion, I made caramelized apple slices to decorate the top of my cake. The glazed apples were tasty and delicious! I also topped the cake with a sprinkling of candied ginger, which I had in my pantry.