Showing posts with label cookies. Show all posts

Friday, March 13, 2009

Pecan snowballs (otherwise known as Mexican Wedding Cookies)


These are one of my favorite holiday cookies. They should be sweet, crumbly, and melt in your mouth. I know it doesn't make much sense to post about holiday cookies in March, but I can't help it if my cravings don't always follow the seasons! It's not my fault if they look like miniature snowmen.

I've eaten many different versions of these cookies, so I was curious to try Martha's version. Her recipe is very simple.

Ingredients:

1 cup (3 1/4 oz) pecans
2 cups powdered sugar
2 cups all-purpose flour
1/4 tsp salt
2 sticks unsalted butter, softened
1 tsp vanilla extract
1/2 tsp almond extract
Preheat the oven to 350 degrees and place oven racks in the upper and lower thirds of the oven. Line two baking sheets with parchment paper and set aside.

Grind the pecans and 1/4 cup powdered sugar in a good processor until the nuts are finely ground.


Whisk together the sugar-nut mixture, flour, and salt in a large bowl.


Using the paddle attachment of your stand mixture, cream the butter and 3/4 cup powdered sugar on medium speed until light and fluffy, about 4 minutes. Add the vanilla and almond extracts and beat until combined.

Add the flour-nut mixture and beat on low speed until everything starts to hold together.
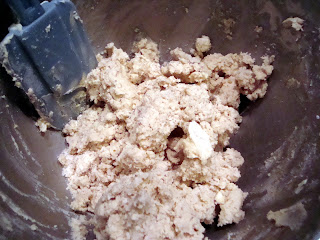
Roll small pieces of dough into 1/2 - 3/4 inch balls and place them 2 inches apart on the baking sheets. Bake the cookies until they are lightly browned on the bottom but still light on top, approximately 10-12 minutes. Rotate the baking sheets (top to bottom and front to back) halfway through baking. The cookies may flatten slightly while baking.

Transfer the cookies to a wire rack to cool.
After the cookies have cooled completely, toss the cookies with 1 cup powdered sugar in a large bowl. Make sure the cookies are completely covered with sugar.

Enjoy!

Thursday, November 20, 2008

Pumpkin Whoopie Pies

Life has gotten very busy lately, so I've been neglecting my blog. I hope to rectify this with some new posts over the next few days. Sorry!

Recently, I've seen a lot of people blogging and talking about making Pumpkin Whoopie Pies, which are kind of like pumpkin moon pies. This seems to be the trendy home baking dessert of the season. They sounded great to me, so I thought I'd give them a shot for a work potluck.

Martha Stewart has a recipe for Pumpkin Whoopie Pies on her web site, but her recipe involves chocolate cakes and pumpkin filling, which isn't what I wanted. I wanted to make a version with pumpkin cakes and cream cheese frosting. A friend sent me another recipe, which sounded like what I wanted. I adapted it slightly, and I'm excited that I can actually post a full recipe here!

Ingredients:

1 1/2 sticks (6 ounces) unsalted butter, 1 stick melted, 1/2 stick softened
1 cup packed light brown sugar
2 large eggs, at room temperature, lightly beaten
1 cup canned pure pumpkin puree (NOT pumpkin pie filling)
1 teaspoon cinnamon
1/2 teaspoon ground nutmeg
1/2 teaspoon ground cloves
1/2 teaspoon ground allspice
1/2 teaspoon ground ginger
1 1/2 teaspoons pure vanilla extract
1 teaspoon baking powder
1 teaspoon baking soda
3/4 teaspoon plus 2 pinches salt
1 2/3 cups flour
4 ounces cream cheese, chilled
1 cup confectioners' sugar

Directions:

1. Preheat the oven to 350°. Line two baking sheets with parchment paper.

2. In a medium bowl, whisk together the flour, baking soda, and baking powder.

3. In a large bowl, whisk together the melted butter and brown sugar until smooth. Whisk in the eggs, pumpkin puree, spices, 1 teaspoon vanilla, and 3/4 teaspoon salt. Using a rubber spatula, fold in the flour mixture.

3. Using an ice cream scoop or tablespoon, drop 12 generous mounds of batter, spaced evenly, onto each baking sheet. Bake until springy to the touch, about 10 minutes. Transfer to a rack to cool completely.

4. Meanwhile, using an electric mixer, cream the softened butter with the cream cheese. Add the confectioners' sugar and the remaining 2 pinches salt and 1/2 teaspoon vanilla; mix on low speed until blended, then beat on medium-high speed until fluffy, about 2 minutes.

5. Spread the flat side of 12 cakes with the cream cheese frosting. Top each with another cake.

Now for the step-by-step procedure with photos:

First, I mixed together the melted butter and brown sugar until smooth.

Then I whisked in the eggs, 1 teaspoon vanilla, and 3/4 teaspoon salt.


I added the spices and pumpkin, which made the batter much thicker.


Then I folded my flour mixture (which also included baking powder and baking soda) into the liquid batter.

Step One:

Step 2 (with the flour half-way mixed in):


Step 3, with the flour completely incorporated:


I spooned the small cakes onto a baking sheet lined with parchment paper.


And this is what they looked like when they came out of the oven.


While the cakes were cooling, I made the filling. First, I mixed together the butter and cream cheese.


Then I added the confectioner's sugar. Mmmm... creamy.


I added a generous amount of filling to the bottom half of 12 cakes, and then topped them with another cake. There was a lot of cream cheese frosting, so I didn't have to skimp.


These were fun, very tasty, and also easy to make. I would definitely make these again!

Tuesday, November 4, 2008

Ebony and Ivory (aka Black and White cookies)


Ebony and ivory/live together in perfect harmony/side by side on my piano...


I asked my husband to pick his Top 3 cookie recipes from Martha's Baking Handbook, and he immediately chose the Black and White Cookie. He grudgingly found two other possibilities, but he was practically giddy with excitement over these cookies, so I decided to be nice and make them for him.


My only knowledge of Black and White Cookies comes from the infamous Seinfeld episode where Jerry and the gang visit a bakery to buy a hostess gift for a party they are attending. Elaine almost kills a woman over a chocolate babka, and Jerry finds comfort in a Black and White Cookie (which, ironically, eventually makes him sick). Hopefully these cookies will have better karma than Jerry's.


I started by making the cookie dough. I whisked together the dry ingredients (flour, baking soda, salt) in a large bowl.


Next, I creamed the butter and sugar together, using my stand mixer.


Nice and fluffy!


I added the eggs, one at a time, and then the vanilla extract. I blended them until they were well-incorporated and the batter was creamy.


Finally, I added the flour mixture and some heavy cream. You know a recipe is going to be good when it involves heavy cream.


The batter tasted okay (yes, I always taste my batter... don't you?) It tasted like typical sugar cookie dough. I'd never tried Black and White cookies before, so I wasn't sure what to expect.

Per Martha's instructions, I formed the dough into small balls and placed them on cookie sheets to bake in the oven.


After my first batch, I realized the cookies didn't flatten very much during baking, so I needed to form the dough into a disk-like shape before baking them. Unfortunately, I didn't take another photo of them after I started doing this, but I basically just flattened out the balls of dough I made the first time.

Per Martha's instructions, I took them out of the oven when the edges were ever-so-slightly browned. My husband supported these instructions, because he said the cookies were supposed to be cake-like.

My dog REALLY wanted a cookie. (She also desperately needed a hair cut. She could have claimed the title of The Shaggy Dog when this photo was taken. Don't worry, she's gotten a hair cut since then.)


After I baked the cookies, I realized that they didn't look as perfectly round as the ones in Martha's photos, and I knew I should have used a cookie cutter (this isn't part of her recipe). So I decided to improvise, and I decided to make slightly more perfectly round cookies by cutting my cookies with a round biscuit cutter. You can also see a photo of Martha's cookies in the background of this photo.


At this point, I ate some of the cookie scraps (it was my duty to test them), and I was slightly underwhelmed. They tasted like plain sugar cookies, and I'm not a huge fan of plain sugar cookies. I wasn't sure if this project was going to be worth it in the end, but I forged ahead. My husband, on the other hand, thought the cookies tasted perfect at this stage.

While the cookies were cooling, it was time to make the icing. The icing was very simple - just heavy cream and powdered sugar for the white icing, and then you add dutch-process cocoa powder to make the chocolate icing.

First, I sifted the powdered sugar into a large bowl. This frosting used a lot of powdered sugar. Like a whole box worth. There was powdered sugar all over the place by the time I finished this!


I whisked the heavy cream into the sugar until it was smooth. This frosting was VERY sweet.


I poured half of the white icing into a second bowl, so I could turn it into chocolate. I added a healthy amount of cocoa powder, and voila - chocolate frosting! This was DELISH, by the way. I had a little extra, and I'm saving it for some other purpose. Like maybe eating it with a spoon.


Side note: I had to use some cookie scraps to make an Obama cookie. Mmm edible politics.


Where was I? Oh yes, icing. I started with the white icing. I used an offset spatula to frost the cookies. I folded a piece of parchment paper in half, so it had a straight edge on one side, and I flattened it over half of the cookie, in an attempt to try to form a relatively straight line in the middle of the cookies. Then I frosted the side that wasn't covered by parchment paper. They aren't perfect, but I think I did a pretty good job.

You may notice that one of the cookies in this photo is completely covered in white icing. There was another cookie that fell into the bowl of chocolate icing, so it was completely covered in dark brown frosting. I called it The Augustus Gloop Cookie.


After the white icing had dried, I frosted the other side with chocolate.


I think they turned out pretty darn well, if I do say so myself. They were a pain to make, but they look pretty good. And now I'm a Black and White cookie convert. They are delicious! The icing definitely adds a lot to the cookie, especially on the chocolate side. I could eat a dozen of these with no problem.


Monday, September 22, 2008

Oatmeal Chocolate Chip Cookies

When I asked my husband what he wanted me to bake this weekend, he said "oatmeal cookies." I'm not a huge fan of traditional oatmeal-raisin cookies, mostly because I don't like a lot of raisins in my baked goods. So, I decided to use Martha Stewart's recipe for oatmeal-raisin cookies, but I substituted dark chocolate chips for the raisins. It turned out really well, but I'm sure it would also be great with raisins or another type of dried fruit, if that's what you prefer.

The recipe in her book is very similar to this one for oatmeal-raisin cookies from her web site.

The first step of the recipe was to mix together the dry ingredients (except for the oats). There were a couple of unique ingredients in this recipe, including shredded coconut.


Then I creamed the butter and sugar in my stand mixer. Here is a "before" picture...


And an "after" picture....

I added eggs and vanilla, and then added the flour mixture to the sugar/butter mixture. Finally, I stirred in the oats and chocolate chips.


This is a great cookie dough batter to eat raw. I ate a little too much of it that way!

I baked the cookies in my convection oven, and I was able to cut down on the recommended baking time by about 1/3. I think the final results speak for themselves:


This is a great, hearty cookie with a lot of oat flavor. I think it emphasizes the oats as much as the chocolate. If you're looking for a traditional chocolate chip cookie, this may not be the best recipe for that. But if you want really good oatmeal flavor, with a decent chocolate kick, and a hint of spice, I would recommend it.